There is a plethora of gallery plugins available for WordPress, and while EWWW I.O. integrates nicely with NextGEN and FlaGallery, what if you’re using something else? The good news is that EWWW I.O. has you covered. Some gallery plugins use the Media Library to store images, and EWWW I.O. automatically optimizes those images as you upload them.
But if your gallery images aren’t stored in the Media Library, what do you do then? Or, what if they are in the Media Library, but WordPress is generating too many resizes per upload, and the Bulk Optimizer keeps timing out? That is when you use the Scan & Optimize function on the Bulk Optimize page, and I’m going to give you some pointers to help make it easier to get those galleries optimized and start boosting your traffic.
Folders to Optimize
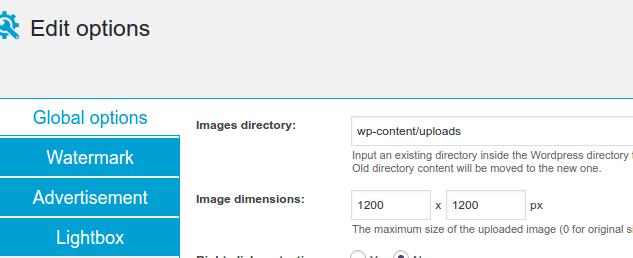
The flexibility of EWWW I.O. really shines here, and you can optimize any folder within your WordPress root or your uploads folder. If that’s not awesome enough, you can even override those restrictions with the ‘ewww_image_optimizer_folder_restriction’ filter to optimize any folder that the web server can access. In this example, we’re going to use the Gallery plugin by Web Dorado. The Gallery plugin lets you configure where your gallery images are stored, but by default, they are in wp-content/uploads/ as you can see here:
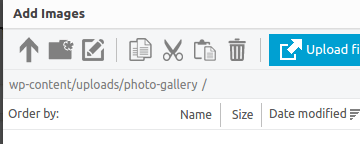
You can even narrow that down a bit further, by looking at the Gallery uploader, where it shows the sub-folder that will be used to store gallery images:
So while one of our Gallery images might be accessible from https://example.com/wp-content/uploads/photo-gallery/guinea-pig.jpg that only gives us a portion of what we need to know. There are two parts that folks sometimes have trouble with when figuring out what to put in the Folders to Optimize setting:
- Confusing a url with a file-system path.
- Knowing the difference between a relative and full/absolute path.
If we look at the url, we might be tempted to enter https://example.com/wp-content/uploads/photo-gallery/ into Folders to Optimize, but that is a url, and does not tell EWWW where the images are actually stored on the server. However, it does give us a clue, as part of the url matches the path from the Gallery uploader: wp-content/uploads/photo-gallery/
That is what is known as a relative path. It is “relative” to the location where WordPress is installed, and still doesn’t tell EWWW exactly which images we want to optimize. If we look at the Folders to Optimize setting, there is a clue directly above the input box. EWWW I.O. tells us something like “must be within /var/www/html/xyz/”. The folder listed there is the absolute path of your WordPress install. So given that we know the relative path from the uploader, and we now know the absolute path to the WordPress install, we can construct the full path: /var/www/html/xyz/wp-content/uploads/photo-gallery/
We enter that into the Folders to Optimize, and hit Save, but what next?
Scheduled Optimization
EWWW I.O. can automatically scan the folder you configured for new/unoptimized images, and optimize them on an hourly schedule. There’s even a filter that lets you change the default schedule, and you can even create custom WordPress schedules if the defaults are not enough. When you turn on Scheduled Optimization, it goes beyond just the folder you configured though. It will also scan any images within your theme, your child theme, Meta Slider images, BuddyPress avatars, BuddyPress Activity Plus images, Grand Media Galleries, and WP Symposium images.
While the schedule is hourly, wp-cron has a small limitation: it only runs when your site gets visitors. On a well-trafficked site, that’s not a problem, but on less popular sites, Scheduled Optimization may have intervals greater than an hour before it kicks in and does another scan. Also, if your site has a LOT of images, it’s best to run a full Scan & Optimize before you enable Scheduled Optimization. And you should definitely not be running both at the same time.
Scan & Optimize
You’ll find this function on the Bulk Optimize page, and it will scan for the same images as Scheduled Optimization. The scanner stores the images it finds in batches, so if you hit a memory limit, or a server timeout, it will just keep re-trying until it finishes scanning. If it reaches the maximum retries (10), you can just refresh and hit the Scan button again. Once it finishes scanning, the process is very similar to the regular Bulk Optimize for the Media Library, except that it only does one image at a time and is thus much less prone to timeouts.
EWWW I.O. also has an option to include the last two months’ worth of images from the Media Library if you are using year/month folders. Using the Folders to Optimize and EWWW I.O.’s Scan & Optimize, no image is out of reach, and your site will be faster than ever.