This is the first part in a series on starting your own website. We are going to start at ground zero with domains and DNS (the “telephone book” of the Internet). When you are looking to start a site, often the first thing someone will ask is, “What domain name do you want to use?” Choosing a domain name isn’t necessarily the first thing you have to do though. Many web hosts will let you start building a site without your own domain name. But we’ll talk more about web hosting next time.
So, what’s a domain name, what do you need it for, and how do you get one?
A domain name is your way of staking out a place on the Internet. This is where you showcase your work, products, or ideas, like my-name.com or superawesomestore.com. Depending on the purpose of your site, you might use .net, .info, .biz, or even .art. The portion of a domain name to the right of the dot is a TLD or “top level domain”. A normal “domain name” then, is a second-level domain (SLD or 2LD), the portion to the left of the dot. Think of the TLD like the city we want to move into, and the SLD is the particular house we’re interested in. We put those two together (with a dot between), and that is our domain name.
Buying a Domain Name
A domain name (like my-name.com) is something you essentially “rent” from a company that is a “domain registrar”. A domain name is not a web site by itself. It is merely a name that points folks to where your site lives. You might “rent” your domain from a web host, or you can choose to register it elsewhere. I say “rent” rather than “buy” because it’s a fee/subscription that you need to pay every year. If you don’t renew your domain name, it goes back into the market for anyone else to purchase.
Many web hosts will even offer one free domain registration with their hosting plans. You certainly don’t want to pay more than you need to for domain registration, so don’t fall for upsells and the like when registering a domain. I prefer to keep my domains and web hosting separate, as it makes switching web hosts a lot easier. Especially if you start with a cheaper web host, it doesn’t hurt to keep your domains elsewhere. There’s no shame in cheap hosting when you’re just starting a site. But you might find yourself needing to “jump ship” in a hurry, and it’s good to be prepared.
Domain Privacy
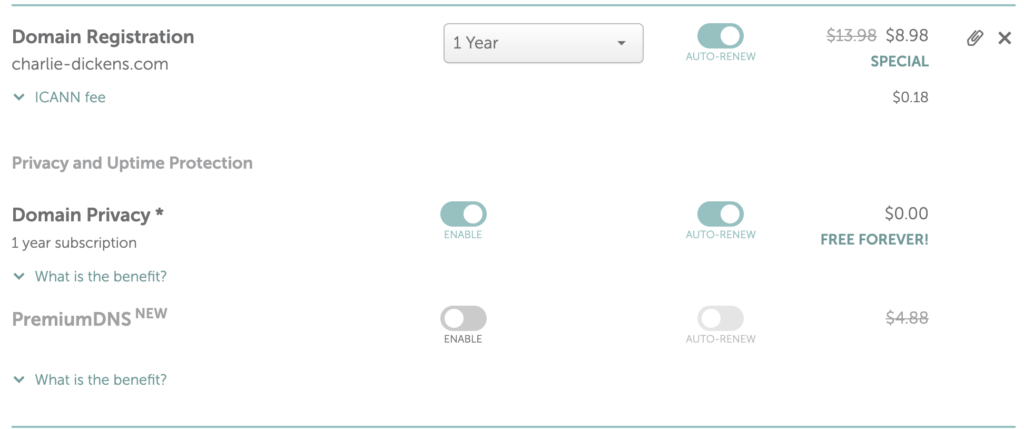
There is only one “add-on” I consider worthwhile when registering a domain, and that is domain privacy. You might also see it labeled “whois guard” or something like that. See, when you register a domain, your registrar is required to make certain information publicly available: your phone number, street address, email, etc. By law, there must be a way folks can contact you if there is a problem with your domain or site. “Domain privacy” is a feature that masks/proxies this information through your registrar (or web host). This way, they can weed out spammers that might try to (mis)use your information.

Now, while some may call domain privacy an “add-on”, I see it as an essential service. Thus, you shouldn’t have to pay extra for domain privacy. If you find someone charging extra for this feature, go somewhere else to register your domain.
How much should I pay for a domain name?
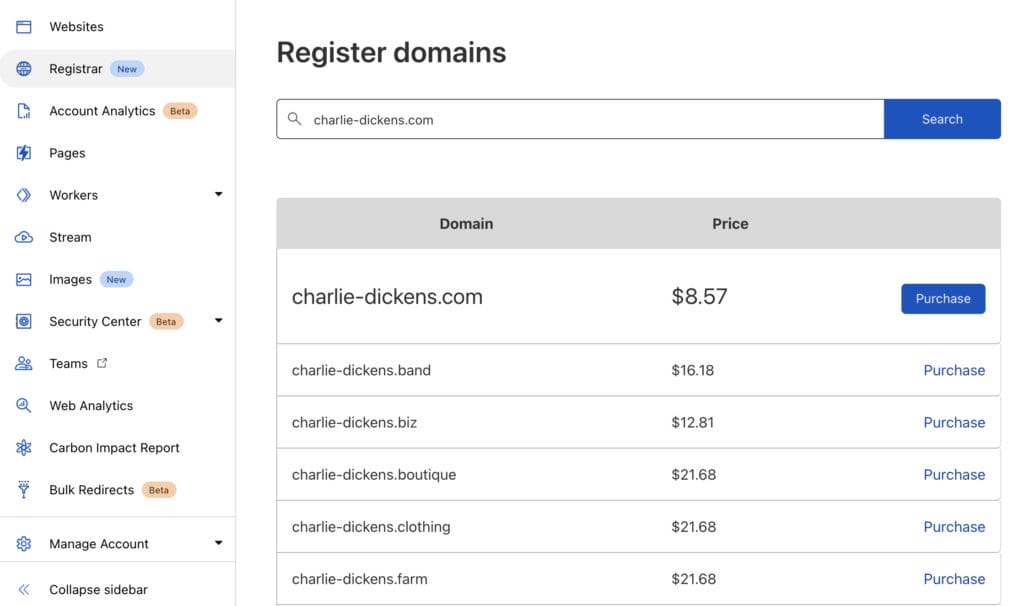
Speaking of cost, watch out for over-priced registrars also. Most domain registrars only add a small fee on top of the “wholesale” cost that they pay. However, some registrars charge double or triple the wholesale cost! Cloudflare has zero markup, which is my personal favorite. As a general rule, you shouldn’t pay more than $15 for a .com or .net domain. That said, some specialty TLDs, like .io or .shop, might cost $25 or more. Make sure to shop around, or just check Namecheap for a good reference.

What about that DNS thing?
DNS is the Domain Name Service (creative, huh…), and is the “phone book” of the Internet. It’s how you point your domain name at your web site. More specifically, DNS points your domain to the server where your web host stores the files for your site. If you purchase a domain name from your web host, then you don’t usually need to change anything with DNS. In that case, DNS management should be done automatically. But even then, there might be cases that require changing some DNS records. For instance, we’ll cover how that affects email delivery in a future article.
How does it work?
While folks have written entire books on the subject, we’ll keep it as simple as possible. When you signup with a web host, they put your files on a web server. Now a server is just a computer, like your desktop, laptop, or phone, but with a lot more power (usually). To communicate with other computers, like the devices your future visitors will use, they need an IP address. This is a numerical identifier like 203.0.113.42 which allows a device on the Internet to find some other device on the Internet. Imagine telling someone your website is at 203.0.113.42… Yeah, who’s going to remember that!?
DNS allows you to tell someone, “hey, my website is charlie-dickens.com.” When they type that in their browser, their device will find that charlie-dickens.com is hosted at 203.0.113.42. Then the browser can fetch the web page from your web host, and your potential customers can browse your site.
The DNS system also solves another problem, which is that most servers are hosting multiple sites. So if you just type 203.0.113.42 in a browser, the server at that address is going to say “sorry, I don’t know which site you want, you’ll have to be more specific!”
Types of DNS Records
The DNS system has several types of records. The most commonly used are A (name), CNAME (alias), and MX (mail exchange). Most web hosts will simply use A records that map a domain directly to an IP address. However, some web hosts, like WP Engine, will give you a CNAME/alias to map your domain name to a sub-domain of theirs. This allows them to move your site to a new server, if needed, and no DNS updates on your end are necessary. They do all the changes internally, and it all “just works”.

So, an A record allows you to say, “my (domain) name is charlie-dickens.com, and my site lives at 203.0.113.42.” Whereas a CNAME is more like saying, “my name is charlie-dickens.com and it’s wherever cdickens.wpengine.com says it is.” Oh, and let’s not forget about those MX records. Those let you have an email like tim@charlie-dickens.com and makes sure your messages don’t get lost in Neverland. But again, that’s a topic for another day, so we won’t dwell on that.
Sub-domains and Root Records
Now, there’s a tricky thing with pointing these domains where you need them to go. When editing DNS records, you won’t ever (usually) enter a record for your full domain name, since all the records are “relative”. So for charlie-dickens.com, you would be dealing with records for “www” and “@”. The “@” is a special record that means “at the root”. For example, if someone types charlie-dickens.com into their browser, the browser needs to get the @ record, or the “root” record. If you want to setup more than one site on your domain, then you might add other records/sub-domains. But most of the time, you just need A/CNAME records for www and @.
Name Servers
Every domain will have two or more “name servers”. These are the official record keepers for your domain name. See, you can technically even have your domain registration and DNS at two separate companies. This is done by configuring your domain at your registrar with the name servers of your DNS company.

You can also use this to have your DNS managed by your web host. For example, on a cPanel web host, it’s usually best to let them manage the DNS. This way, you don’t have to update DNS records if your site gets moved to a new server. We’ll come back to that in a minute.
Setup Your First Domain Name
The process of adding a domain to your web host can vary, but we’ll show you two different styles. One on a web host that uses cPanel (A2 Hosting), and one on a managed WordPress host (WP Engine). We registered our domain with Cloudflare, so if you register a domain somewhere else it might look a little different.
Setup a Domain with cPanel
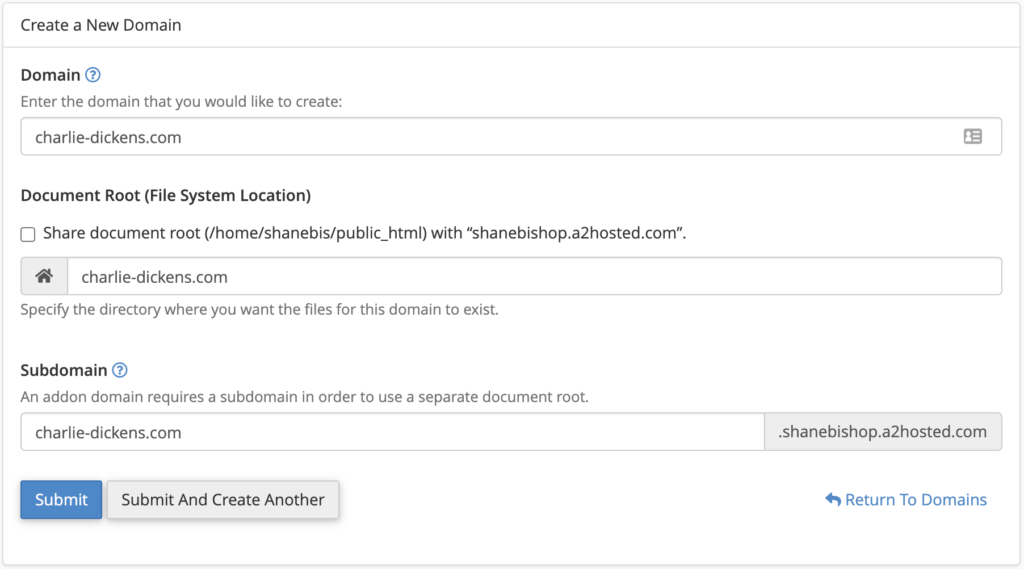
The first step is to go over to the Domains section and click the Create a New Domain button. Generally, you want a separate folder for each domain, so be sure to uncheck “Share document root…”. Then, enter your domain name, hit Submit, and now we’ve told our host that we want to host charlie-dickens.com with them.
It’s important to note that adding a domain in cPanel does not register the domain. With A2 Hosting, one registers domains from the Customer Portal instead. Likewise, registering a domain with a web host may not automatically configure the hosting for said domain.
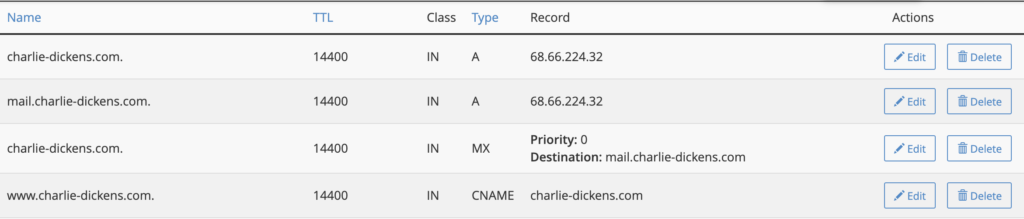
Not much has happened at this point. Our web host created a folder for our website on their server, and setup the default DNS records (on their name servers). When we view the Domains List, we can see an option to Manage the domain.

This lets us remove the domain from our account, along with some handy shortcuts on the right-hand side. One of these links is to “Modify the Zones“, which is code for “edit your DNS records”. If we click that link, we’ll see those default DNS records we talked about.
Setup DNS for a cPanel Domain
If your web host is also your registrar, and you’ve already registered the domain, then you don’t need to do anything else with DNS. Your next step would be to install WordPress (or your preferred CMS) in the folder for your site.
Otherwise, keep in mind that the official DNS records are the ones kept by our name server(s), so now we have a decision to make. Do we manage the DNS ourselves at our registrar? Or do we let our web host take care of that automatically? If you choose to manage DNS with your registrar (or elsewhere), see the section below where we add our records at Cloudflare.
Most web hosts will have their official name servers listed on their site or in their documentation. A2 Hosting has a handy reference, which lists these:
- ns1.a2hosting.com
- ns2.a2hosting.com
- ns3.a2hosting.com
- ns4.a2hosting.com
On our domain management page, we’ll set the custom name servers, making sure to save our changes when we are done.

This is another area where different registrars have differing ways of changing the name servers, so if you get stuck, check with your domain registrar for assistance.
Setup a Domain/Site on Managed Hosting
When you add a site to a Managed WordPress Host, the process is a bit different.
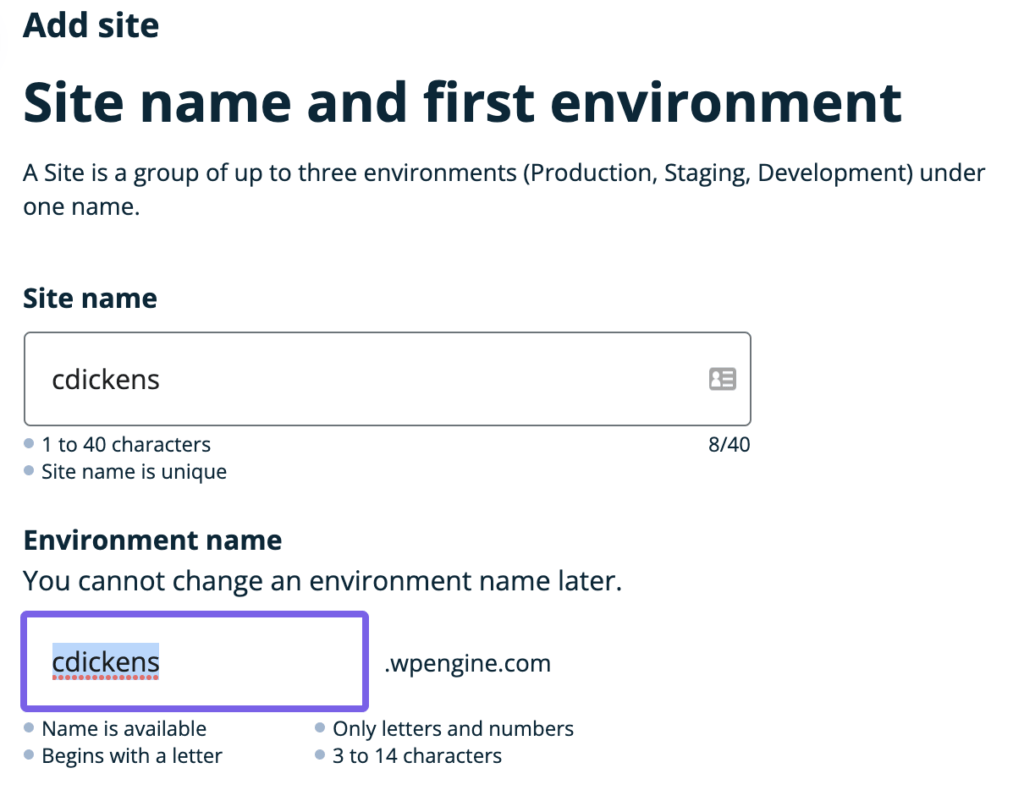
Here we can choose a name/label for our site, which is not generally visible to the public. We can also see that they will initially setup our site with the cdickens.wpengine.com sub-domain. We’ll add our own domain to this site in a moment.
It takes a little bit longer to setup a new site than just adding a domain on cPanel. This is because a managed host will install and setup WordPress for us during this process.
Adding our Domain Name
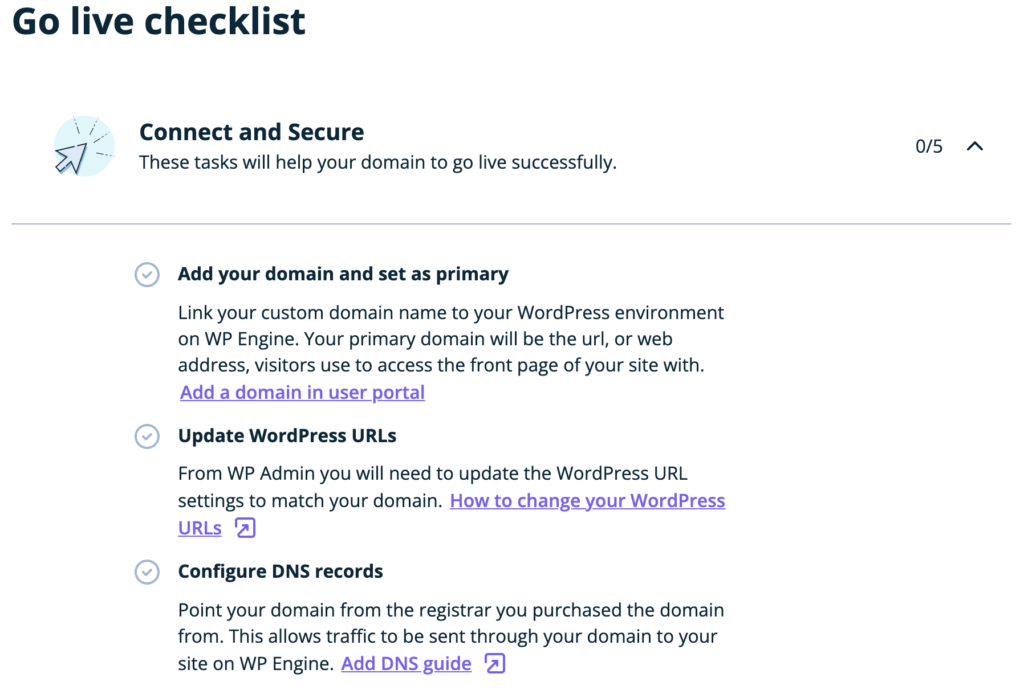
A quality managed host will walk you through most of the steps. WP Engine has a handy checklist that helps us keep track of our progress:
Again, it isn’t strictly necessary to have your domain registered or setup yet. However, if you already know what domain name you’re going to use, do it as soon as possible. It will make things a lot simpler later on.
First, we’ll click the link to “Add a domain…”, and type in our domain name:
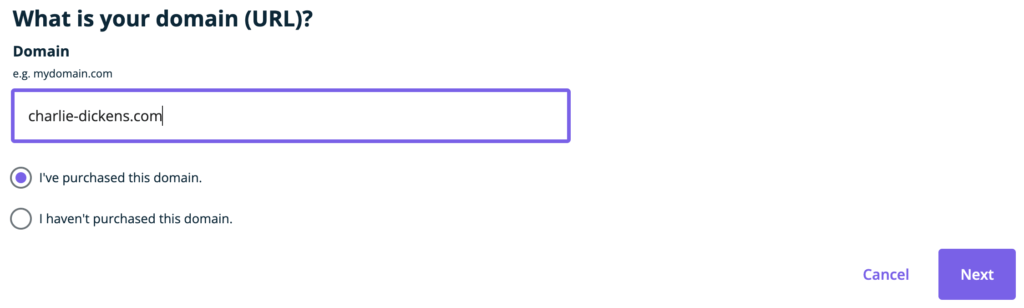
After we click Next, WP Engine correctly detects that our domain is registered with Cloudflare. They have a direct integration (Domain Connect) that will add the DNS records automatically. However, we’ll also show you how you would do it with other registrars where manual setup is necessary.
For instance, at Cloudflare, we’ll login to our account, select our domain, and then click the DNS menu item. Clicking Add Record will show the following:

Note that I’m adding a CNAME record, although the WPE Domain Connect process added an A record earlier. As mentioned, I recommend using the CNAME style for less work if your site is moved to a new server. Though rare, it can and does happen. Servers die, get overloaded, or you might get wildly popular and have to upgrade to a better server with more capacity. One can hope, right?
WP Engine Advanced Network
You might notice on your account that there is a “network upgrade” available. WPE has a fine article that talks more about this, but here’s the short version: it’s fast, secure, and you want it.
When you enable the advanced network on your WP Engine site, again I recommend using the CNAME option. You can head back to Cloudflare (or wherever you manage DNS) to update your DNS records.

Again, the WPE article mentions this, but the short version for Cloudflare users is this… Change your CNAME records to wp.wpenginepowered.com, make sure the proxy status is off, and Save. The proxy status needs to be off, because the Advanced Network already uses Cloudflare. Thus, in proxy mode you’d be routing traffic through Cloudflare twice, and that’s just silly!
Next Steps
If you have more questions about domains and DNS, feel free to post them below. There’s a whole lot more fun to be had in setting up your website. We’ll cover web hosting in more detail along with email (hosting) options and a lot more. Stay tuned!