This is part six and the final post in our series on starting your own website. A good WordPress theme can help your site stand out from the crowd, and lets you make your site look however you want. Some themes are relatively simple. That is, you can customize some things, but the look and feel is going to be pretty much what you’ve seen in any screenshots or previews.
Other themes are more of a framework, and come with a high level of customization. These themes will often have a variety of templates you can import so you don’t have to build things from the ground up. Though if that’s your style, and you have the time to learn, these sorts of themes give you the ability to build just about anything you can imagine.
The Evolution of Themes
When I started using WordPress, what you saw was what you got when it came to themes. That is, if you looked at the preview/screenshot for a theme, that’s exactly how your site would with that theme. There was no Customizer, and any “customization” was limited to editing your menu items and changing the “widgets” that you might have along the side or bottom of your page.
When the Customizer was introduced, it allowed folks to customize a whole variety of things: colors, fonts, images, headers, footers. Of course, the degree of customization varied among themes, and some required you to buy a premium version to unlock all the settings. One could even add custom CSS to fine tune just about any aspect of the theme’s styling.
Over the years, page builders were created that allowed one to build more advanced designs with a variety of “building blocks”. You still had the Customizer for the overall look of the site, but could make each individual page look however you wanted. There were even themes built specifically for page builders. They were nearly “blank slates” giving just the basic framework for a site. That way, you could build everything, from menus, to headers and footers, with your page builder. When the “block editor” was introduced into core WordPress, we began to see even more of this “framework” design style in themes. The theme merely gave you a canvas, and the block editor was your paintbrush.
In the last few years, the theme world has seen a shift, as WordPress has introduced full-site editing (FSE). This essentially makes the “framework” style into a core capability of WordPress, which opens the door for a lot of flexibility, but also can come with some hazards. So, we’ll start with “classic” themes and how you can customize them. Then we’ll look at more advanced “classic” themes that use the “framework” style. Lastly, we’ll delve into the new and promising world of “block themes” that use full-site editing.
Classic Themes and the Customizer

The fundamental difference between Classic Themes and Block Themes, is whether they use the Customizer or the Site Editor. A “basic” classic theme can be just as beautiful as any other theme. It simply doesn’t offer the high degree of flexibility of “framework” or Block themes. This makes them a good starting place for beginners, or for folks who want to get going quickly.
You can get to the Customizer from any page, or from the WP admin by clicking Customize from the Appearance menu. From there, you can usually change the colors used on the site, your logo, the fonts, and various other settings. You can also edit a few settings that are available elsewhere in the WP admin, like Site Identity settings, and Homepage settings. The Homepage setting controls whether your home page is a single static page, or a listing of the latest blog/news posts. However, you can also set it to a static page that includes your latest blog posts as part of the content on that page.
Menus
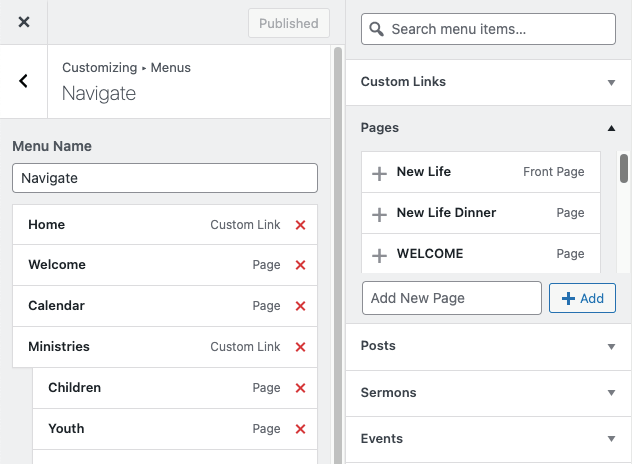
Now, even if you’re building just a blog, you might have a few other pages on your site, like an About page, or a Contact page. How do folks find those pages? You put them in your menu. Classic themes will usually come with one or more Menu Locations. Most commonly, you’ll have a top/header menu location, which is where you would put your main navigation menu.

Once you have a few of your pages created, you’re ready to add a menu… or customize the existing one if the theme already created one. From the Menu section of the Customizer, you can create a new Menu, or edit an existing one. You can name them whatever you like, the names are just to help you stay organized if you have more than one. Be sure to assign your menu to whichever location you like, so that it actually shows up on the page.
From there, you can add pages, custom links, and even other “custom post types” to your menu. For example, on our church’s site, we have CPTs for sermons, events, staff, etc. and can add any of these to the menu. Some themes will also let you “nest” menu items, so pay close attention to whether you want a menu item to be “top level” or be a sub-item of another menu item. Sub-items will be indented in the menu structure.
Widgets
A widget is a section of content in classic themes that is similar to the idea of a block in the block or site editors. Similar to menus, a theme will have various “widget areas” or locations where you can add custom content that will be displayed on every page, or for a particular template (we’ll cover those in a minute).
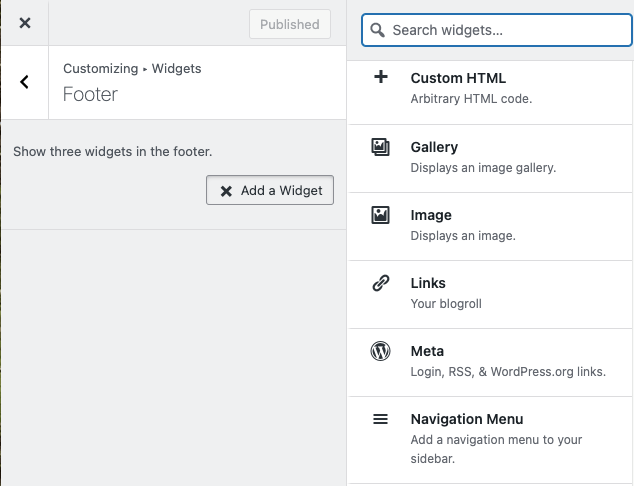
WordPress comes with a set of default widgets, like an Audio widget that displays an audio player, or a Calendar widget where visitors can browse your posts by date. Additionally, any “block” can be used as a widget, and themes will often add custom widgets. Some plugins may have widgets, though most of the time plugins will use the older shortcodes, or implement custom blocks.
Templates
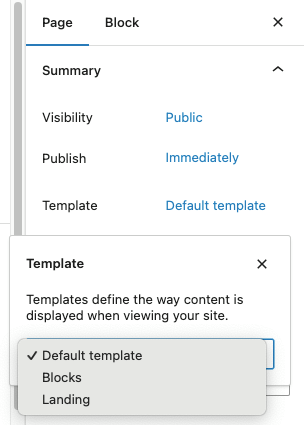
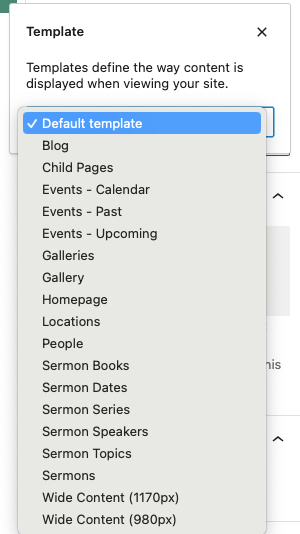
A template is kind of like a sub-theme, in that it modifies the default layout for a theme for a particular use. Templates are applied to particular pages, and can be chosen when you’re editing any given page. Some templates are for a particular type of content, like products, or events, though these usually can’t be applied to pages. Other times, templates are for a specific use case, like a gallery or landing page. And then some themes will have templates to allow for a wider content area, which can come in handy if you have a large table or pricing page that needs more space.
Different templates can have different menu or widget areas, depending on the particular use case. For example, certain themes have a homepage or landing page template that is powered by pre-built widgets that come with the theme. This way, you select the homepage template for your Home page, and then in the Customizer you can pick and choose which of the pre-built widgets you would like to display on that page. This sort of setup can be a little confusing though, which is where “framework” themes generally shine.
Classic Themes as a Framework
This style of theme has all the features of the Customizer, but with a higher degree of per-page flexibility. This allows you to tailor the theme for just about any use case. These themes make greater use of the block editor, often with their own “blocks” for design/layout customization.
Some themes, like Kadence, will have a corresponding plugin that adds a host of blocks for use with the theme. Others, like OceanWP, work with a page builder like Elementor to design each page. Many of these will have free layouts that you can import, along with more layouts when you upgrade to their premium version. While these themes give you a lot of power in your site design, they can be a bit overwhelming for a beginner. So I wouldn’t recommend these for someone just getting started.
Block Themes

While just about any modern theme will work with the block editor, these block themes take that to a whole new level. In a block theme, many (if not all) elements of the site use blocks. This lets you edit just about anything, and make any sort of site you want, but it also comes with some hazards. For instance, if you want to edit the header of your site to add your logo, you need to use the Site Editor. If you use the page/post editor, and edit your header, it’ll only apply to that page, and edits to the global header won’t be applied to that page.
But we’re getting ahead of ourselves, so let’s back up and cover some basics of the site editor. There is a lot to the site editor, so I highly recommend watching some videos, and reading some tutorials (or the official docs), to see what all is possible. This certainly won’t be comprehensive, as the site editor is still changing and improving with each new release. Also, note that I’ve only used two different block themes (Ollie and Twenty Twenty-Four), so I’m by no means an expert in this area.
Templates

If you access the Site Editor via the admin bar from a page, it’ll take you directly to the template for that page. Click the left arrow to back out to the list of templates, and one more level up will be the global site editor menu.
As you’ll see, the templates here are similar to those in classic themes, but we can also edit some templates that are normally hidden in classic themes. For instance, we can modify the templates for single posts, search results, the 404 page, etc.
Navigation
This is the same idea as menus in classic themes, though there may be less cases where you need multiple menus. That is, you might put a menu in your footer, or in a sidebar, but those can often be managed by editing the global “patterns” or “template parts”. And instead of using the navigation functionality, they can be built with standard blocks, like you’ll see in the Ollie theme’s footer. Speaking of template parts and patterns…
Patterns
Patterns are reusable bits of content, anything from a header, to a menu, to whatever you can dream up. Anything you might want to use on multiple pages (or templates) can be saved as a pattern, and block themes typically come with a whole host of their own pre-built patterns. To make your own, simply choose a block (or make a group of blocks) while editing a page, and then click the little … menu to access the Create pattern option. From there you can give it a name, categorize it, and choose whether or not it should be synced.

Now, about this synced and unsynced business, here’s another place to be careful. A synced pattern is like a template part, so if you edit the pattern, it affects every place where that pattern has been used. However, an unsynced pattern is something you can drop into a page and then edit/customize it for that specific page.
Locked Patterns
Many of the patterns that come with themes are unsynced, but locked. That is, you can edit them once you put them in a page, but you can’t edit the pattern itself. But hey, this is WordPress! If you really want to modify a stock pattern, so that your modifications are applied every time you use it, you’re in luck! You can duplicate the locked pattern, which then gives you a copy of that pattern which is now editable. It’s a good idea to rename your new pattern though, so you recognize that it’s different than the stock pattern.
Template Parts
These are special, synced patterns that are used by the theme for particular areas of the layout. You’ll find these near the bottom of the Patterns list, and common template parts are those for the header and footer. But you might also see template parts for things that are re-used by the theme in various templates. For example, in the Twenty Twenty-Four theme, there is a Post Meta template part that is used to display the post date, author name, and the post categories. If you’re not using post categories, or like tags better, you can remove the category list or replace it with a list of tags.
As I mentioned earlier, you need to be careful to only edit template parts in the Site Editor. If you edit a template part in the page/post editor, it will detach from the global pattern, and only be applied to that particular page.
Styles
Each theme will come with several different styles. While you can often edit/change styles on individual blocks, this lets you modify the global colors, fonts, and layout of your site for a consistent look and feel. The styles can even extend to how various blocks are styled, so there’s quite a bit of variety available at just the click of a button.
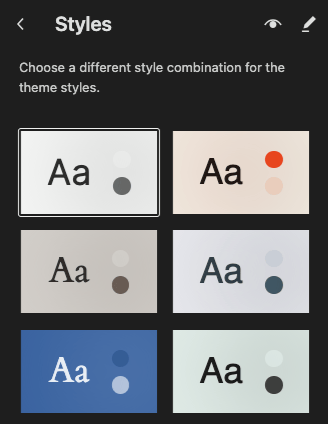
That said, you can even edit the included styles if you’d like to tweak the colors just a bit more, or change the font sizing, or margins, or all sorts of things. There is a ton more information about what you can do with styles in the official docs, but if you’re just starting out, I’d recommend sticking with the pre-built styles.
What theme should you choose?
Well now, that’s the million-dollar question, isn’t it? First, let’s think about which type of theme you want. For most folks getting started, I’d go with a classic theme. These are usually simpler, and offer a fair bit of customization without going overboard.
That said, if you’re careful to keep in mind which things should be edited in the Site Editor, you can start simple in a block theme, and work your way up from there. There’s no reason you have to use all the power of a block theme, just because it’s there. And that’s a really good thing to keep in mind with any theme. Just because you can change something, doesn’t mean you should. Tinker around when you have the brain space to deal with any mistakes you might make.

So, first try searching for a theme specific to what you’re trying to build. For example, on the church site I mentioned, we use a (paid) theme built for churches, and it comes with all the bits we need. There are a lot of themes out there for just about any use case you can imagine. If you get stumped, head over to the free theme directory to see what catches your eye.
Ultimately, don’t be afraid to experiment! Once you have your content in there, themes can come and go. You can always change the theme in six months if you find something better, but start with something you can wrap your brain around and then go from there. There are no limits to what you can build with WordPress, as long as you’re not afraid to learn. And if you’re afraid of that, well…
Bonus: Themes I’ve Used
To be clear, I don’t build a lot of sites anymore, I’m simply too busy to do much of that. This also means any theme I do use needs to be quick and efficient to setup, so that’s likely a good place for beginners to start.
Starting with free themes, on one of my personal (blog) sites I use the Quick Reading theme from Superb Themes. I don’t think you can get that one for free anymore, but they have a ton of different themes available, both paid and free. They also offer a 15% discount with the code ‘ewww15’.
Now, some might think this is unusual, but I’ve also used some of the default Twenty Something themes when they fit the use case. These aren’t “throw away” themes, they were meant to be used, and they do get used a ton. The latest two, Twenty Twenty-Three and Twenty Twenty-Four, are block themes, so keep in mind the pitfalls of block themes. As I’ve dabbled with Twenty Twenty-Four, I’ve found it has quite a lot of customization and could be used for a variety of sites.
In the framework style of classic themes, Kadence is pretty solid. It has a fair number of free layouts you can import, with a lot more if you upgrade. For paid classic themes, my favorite has to be the Genesis family of themes by StudioPress. I’ve heard good things about Genesis from other folks, used one on my wife’s site, and my favorite web host includes a bundle of them (WP Engine owns StudioPress). Lastly, an honorable mention goes out to Church Themes, the creators of several classic themes we’ve used on our church’s site for 6+ years.
Disclaimer: links to WP Engine are generally affiliate links, because they are my favorite, and I use their hosting for most of my production sites. Their affiliate program has zero influence on my recommendations.